Understanding Domain Transfer
Domain transfer refers to the process of moving the ownership of a domain name from one registrar (domain registration service provider) to another. This process involves several steps, including:
-
Transfer Approval: The domain owner needs to approve the transfer. This usually involves obtaining an authorization code (auth code) from the old registrar.
-
Initiating the Transfer: After obtaining the authorization code, the owner can request the transfer to the new registrar.
-
Verification Process: The new registrar will verify to ensure that the legitimate domain owner wants the transfer.
-
Completing the Transfer: Once all verification steps are completed, the domain will be moved to the new registrar, and the owner will receive confirmation.
Why Choose Cloudflare?
When developing a website on a low budget, it is advisable to choose a service that offers many free features to publish the website we have created. Here, I choose Cloudflare because its servers are widely distributed around the world, including in 🇮🇩 Indonesia. Additionally, Cloudflare provides a comprehensive solution to optimize the speed of our website.
Transfer from Niagahoster/Hostinger to Cloudflare
1. Preparing the Domain
At this stage, make sure you already have a domain at Niagahoster or Hostinger that will be transferred to Cloudflare. When purchasing, we do not need to buy an SSL certificate because SSL will only be used if we buy hosting as well; in this case, we do not need hosting.
💡 Tips: For personal portfolio or blog websites, I recommend buying a domain with the .me extension, as it is cheaper and intended for personal branding websites. Reference
2. Changing the Nameserver
- List Domain
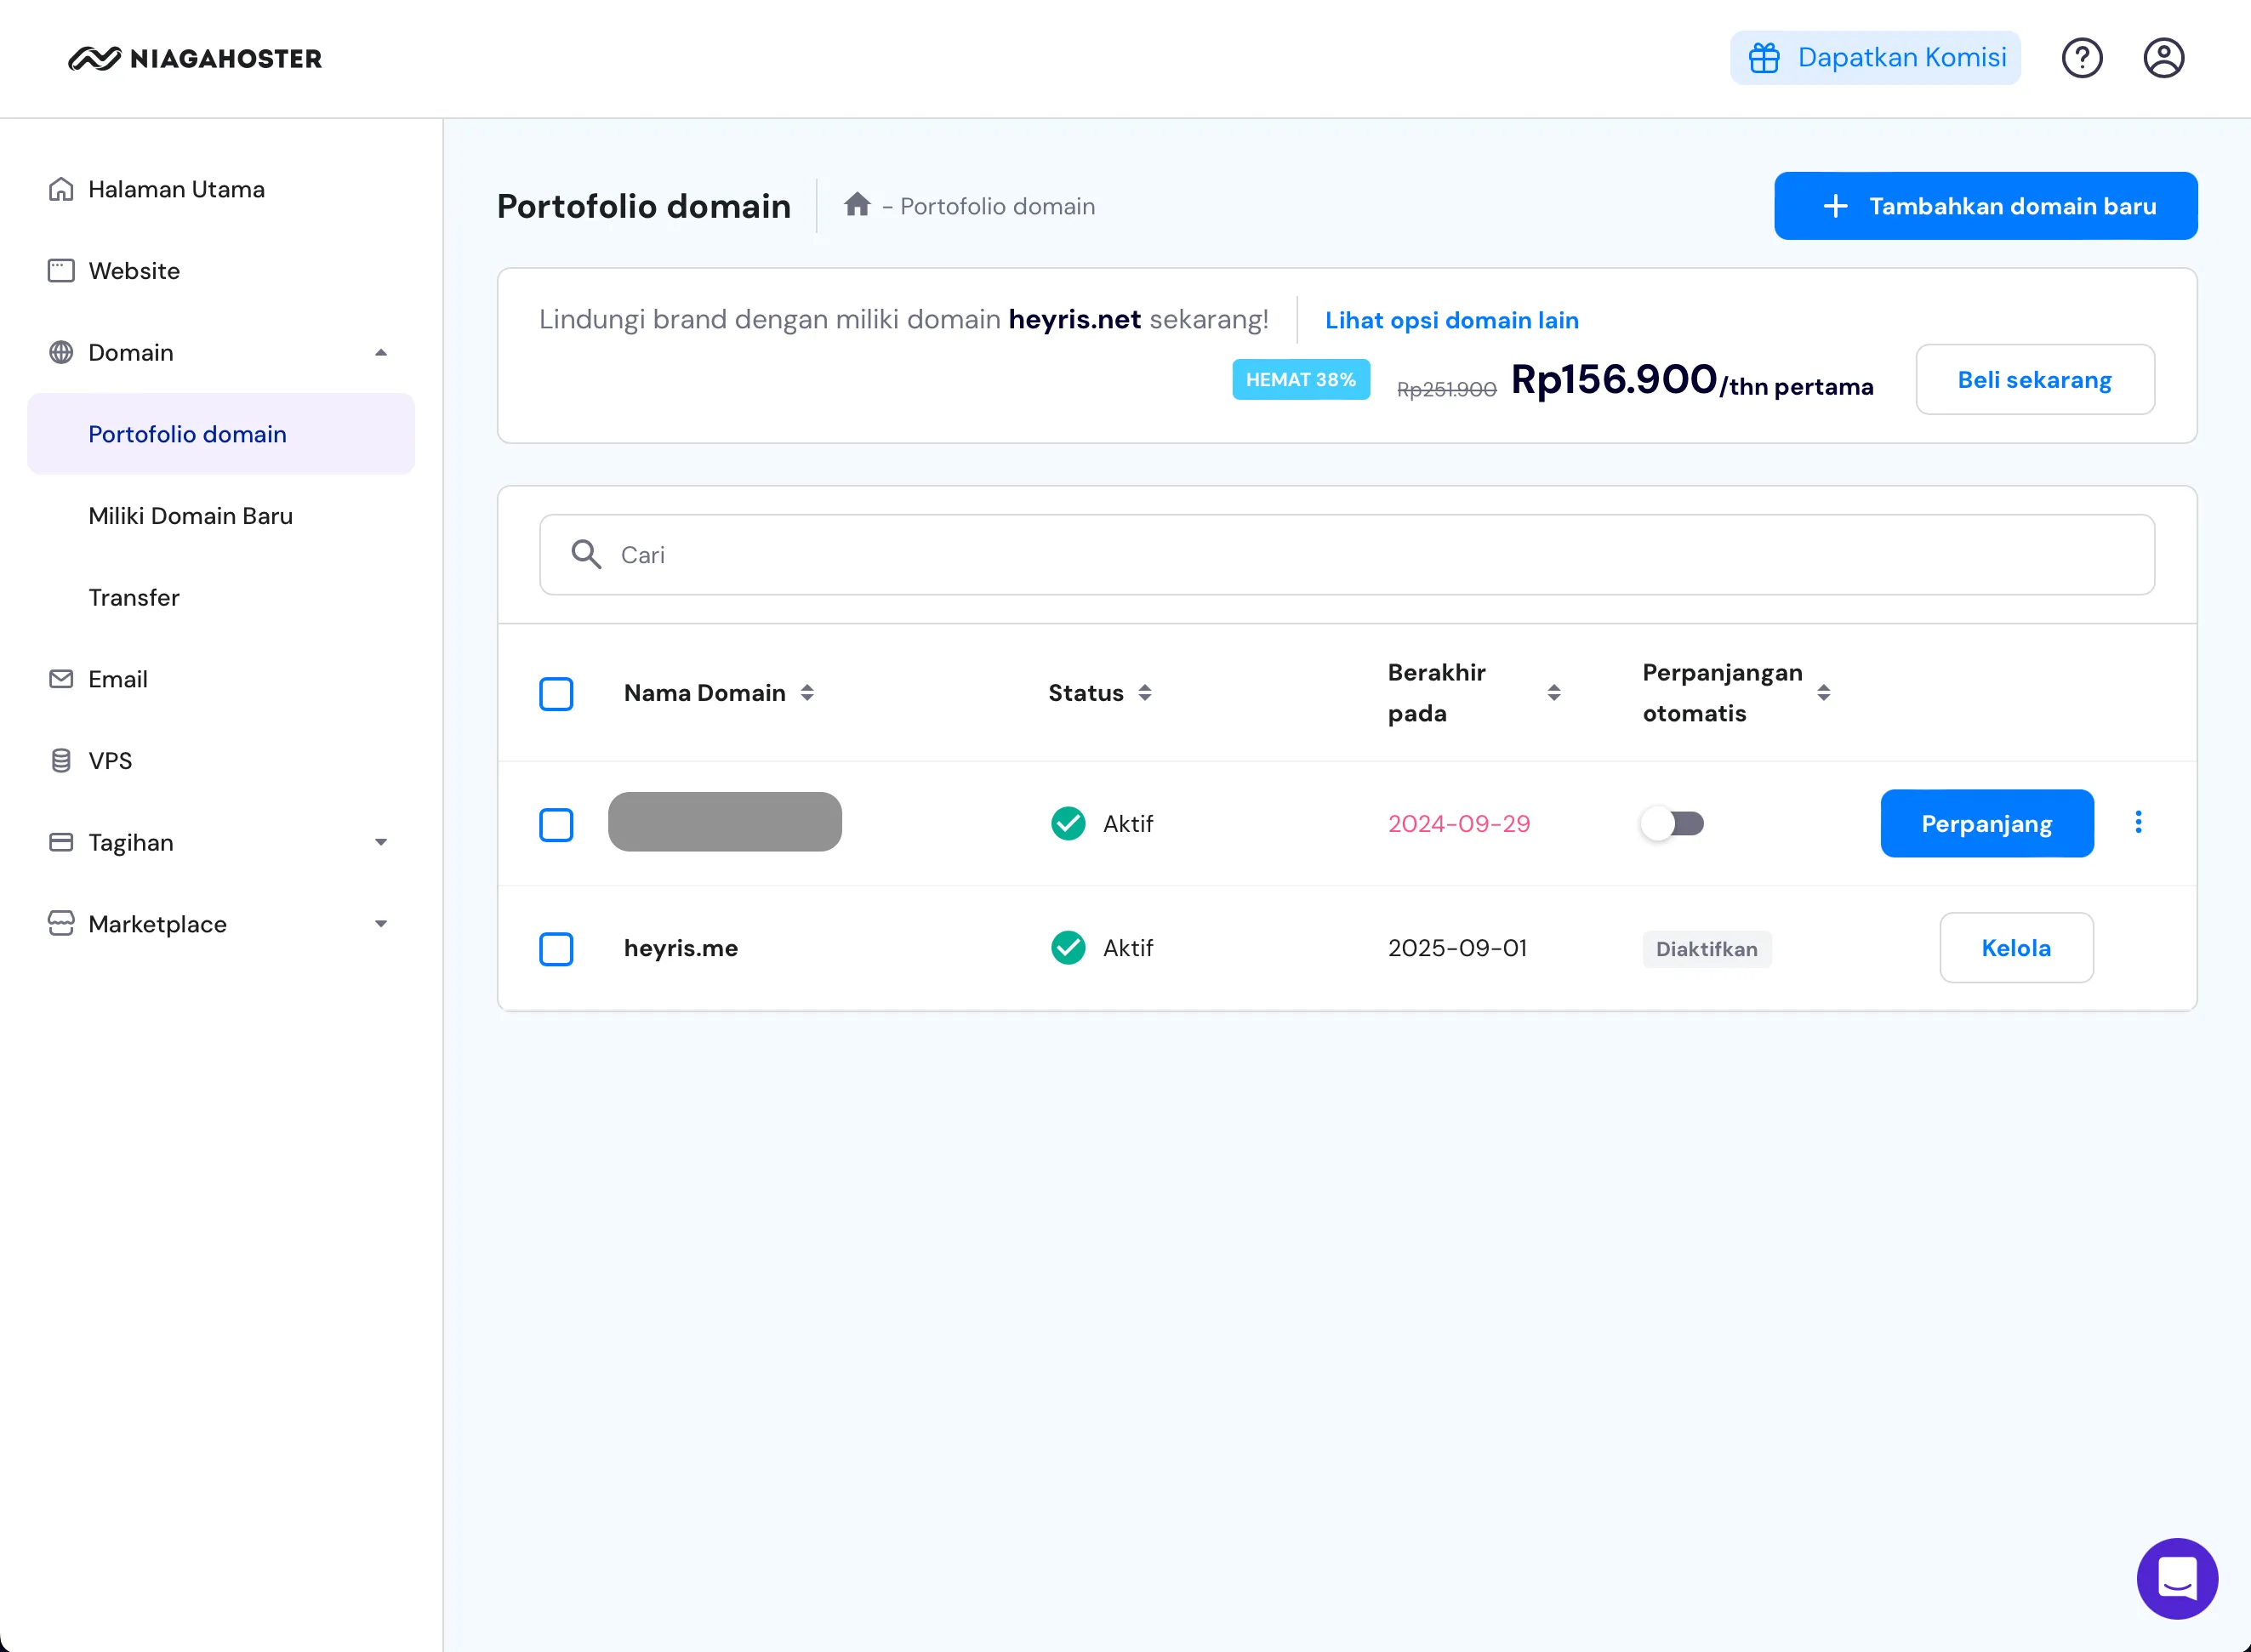 After purchasing the domain, you will have a list of domains you have bought on the Domain Portfolio page. Select the manage menu on the domain you want to transfer.
 - Manage Domain
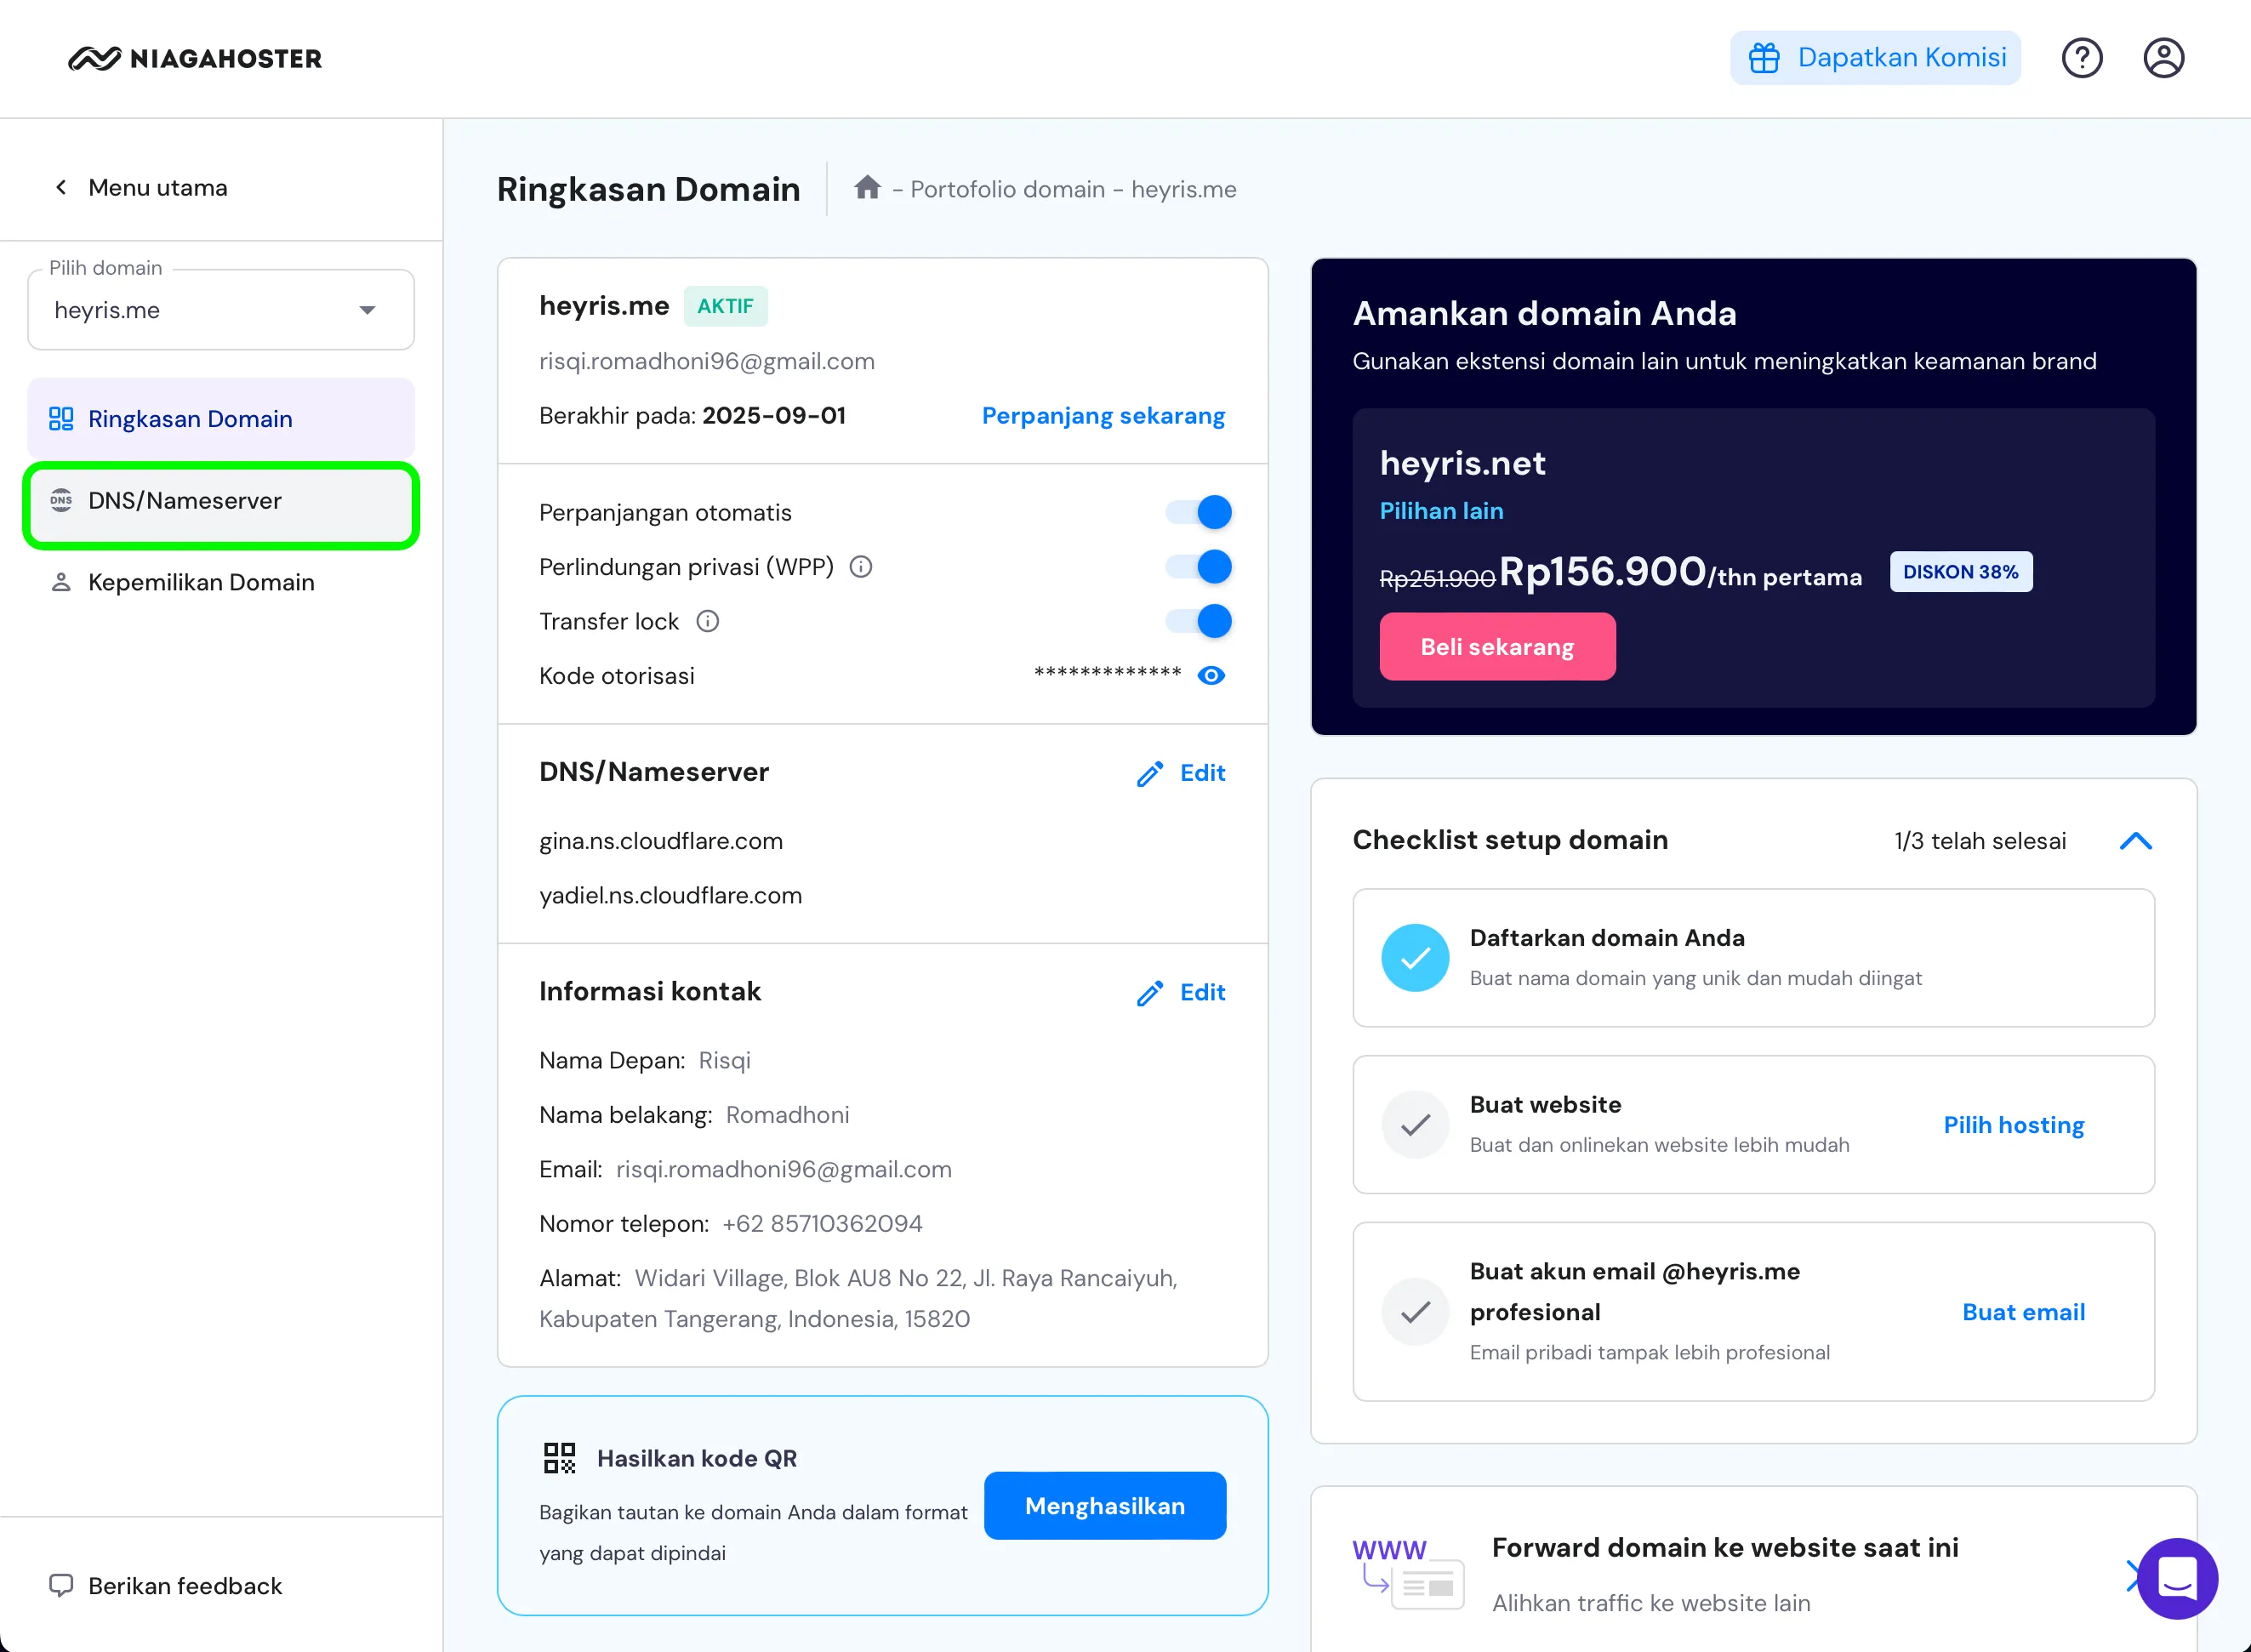 At this stage, you will find the DNS/Nameserver menu where you can see the default configuration set up by the Niagahoster team.
 - Register Domain to Cloudflare
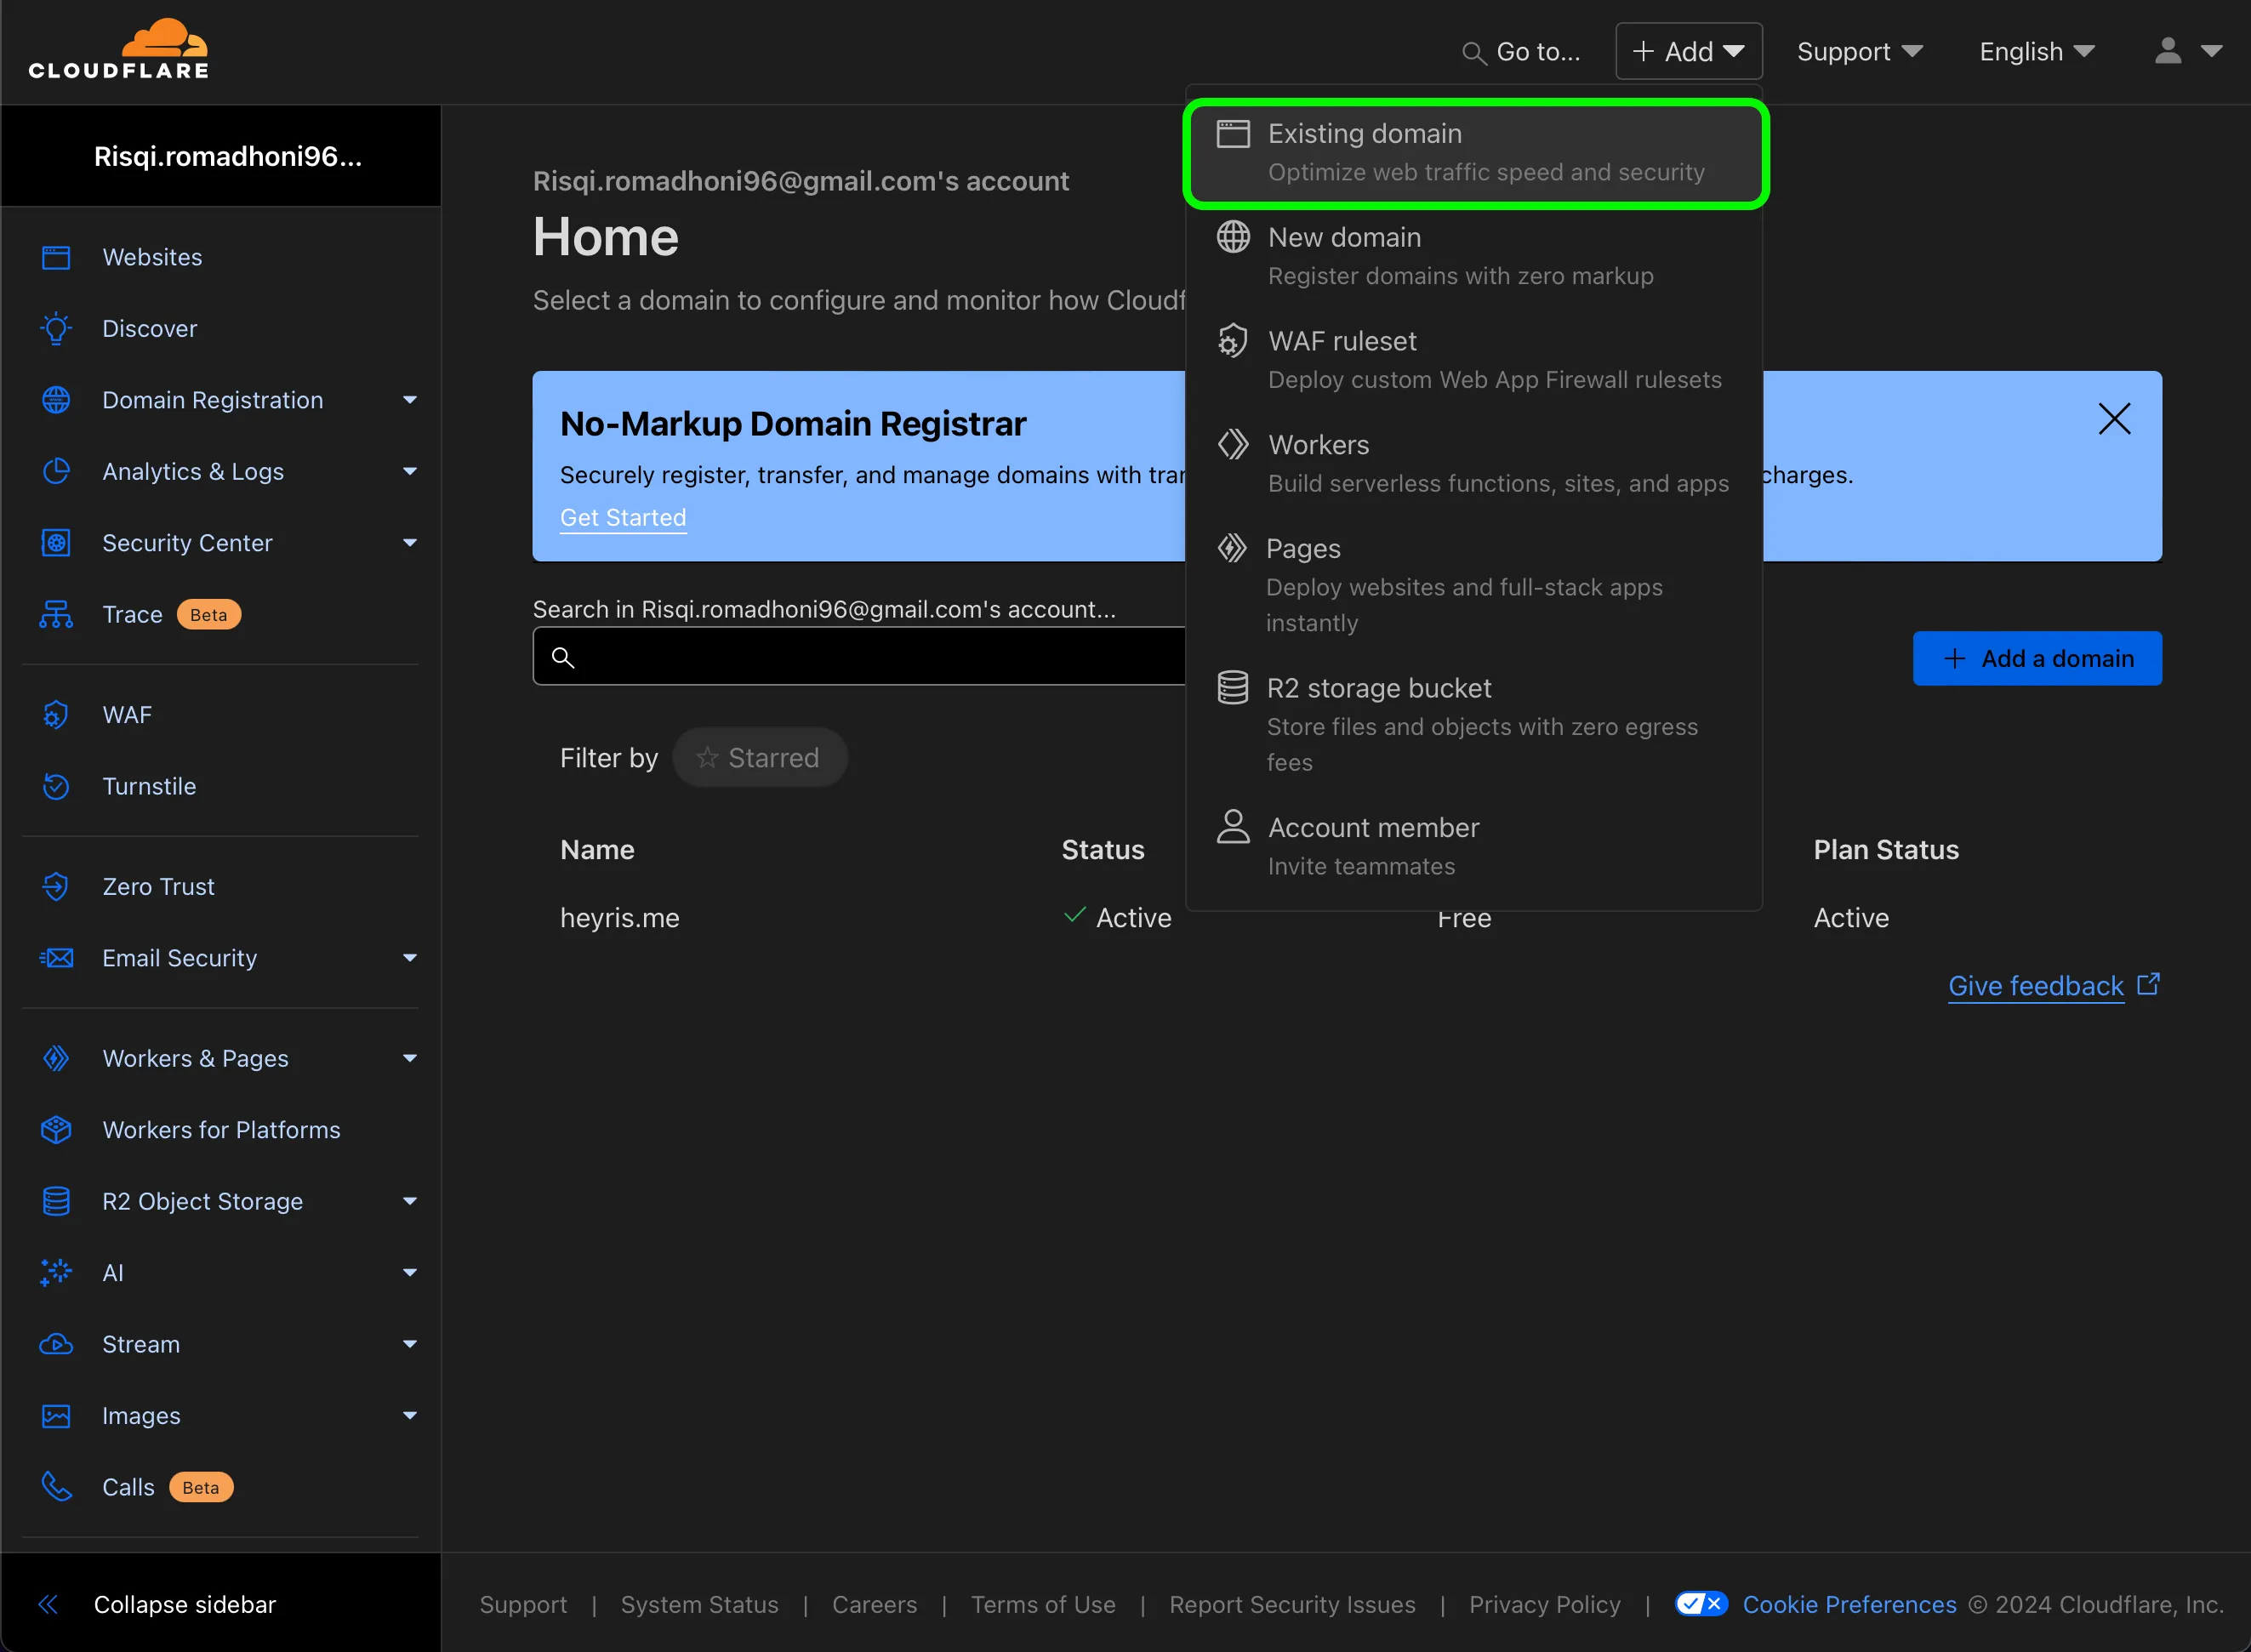 I assume you already have an account at Cloudflare. Then click the “Add” menu on the header as shown in the image above. In the dropdown menu, select “Existing domain”.
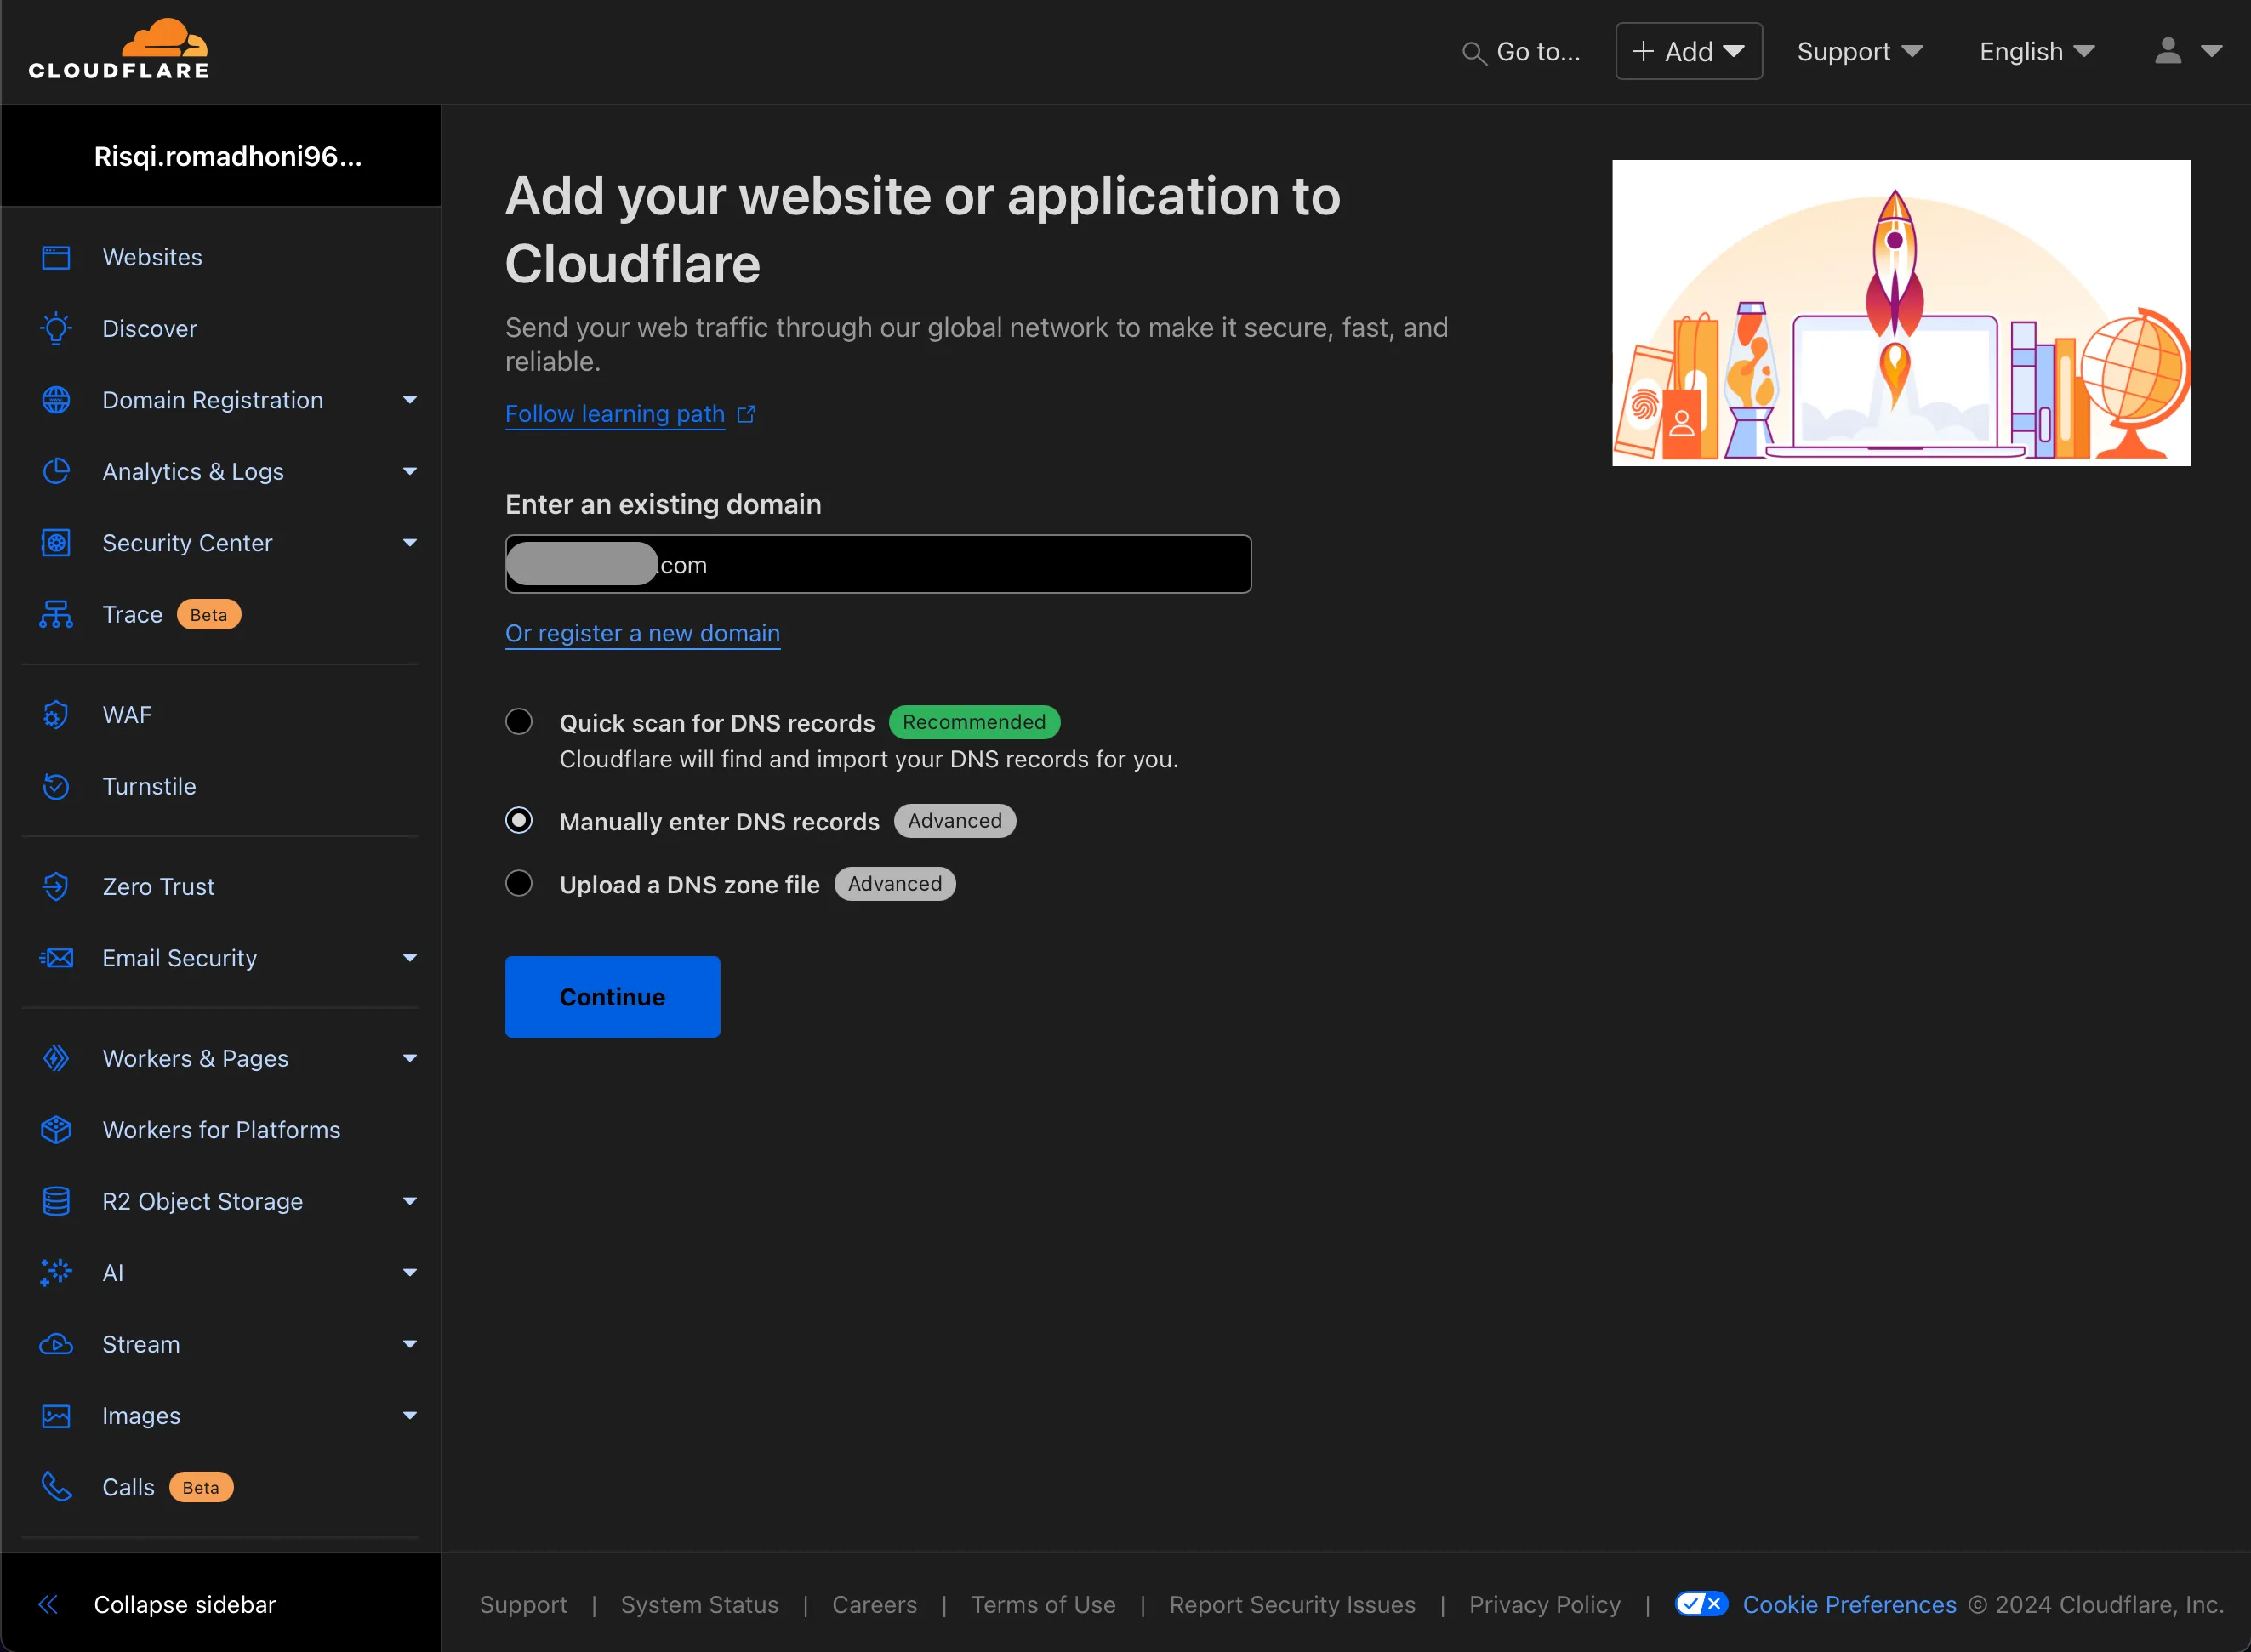 After clicking the “Existing domain” menu, you will be directed to a form to register the domain you bought at Niagahoster or Hostinger. Enter the domain name along with its extension (e.g., heyris.me), then check the radio button “Manually enter DNS records”.
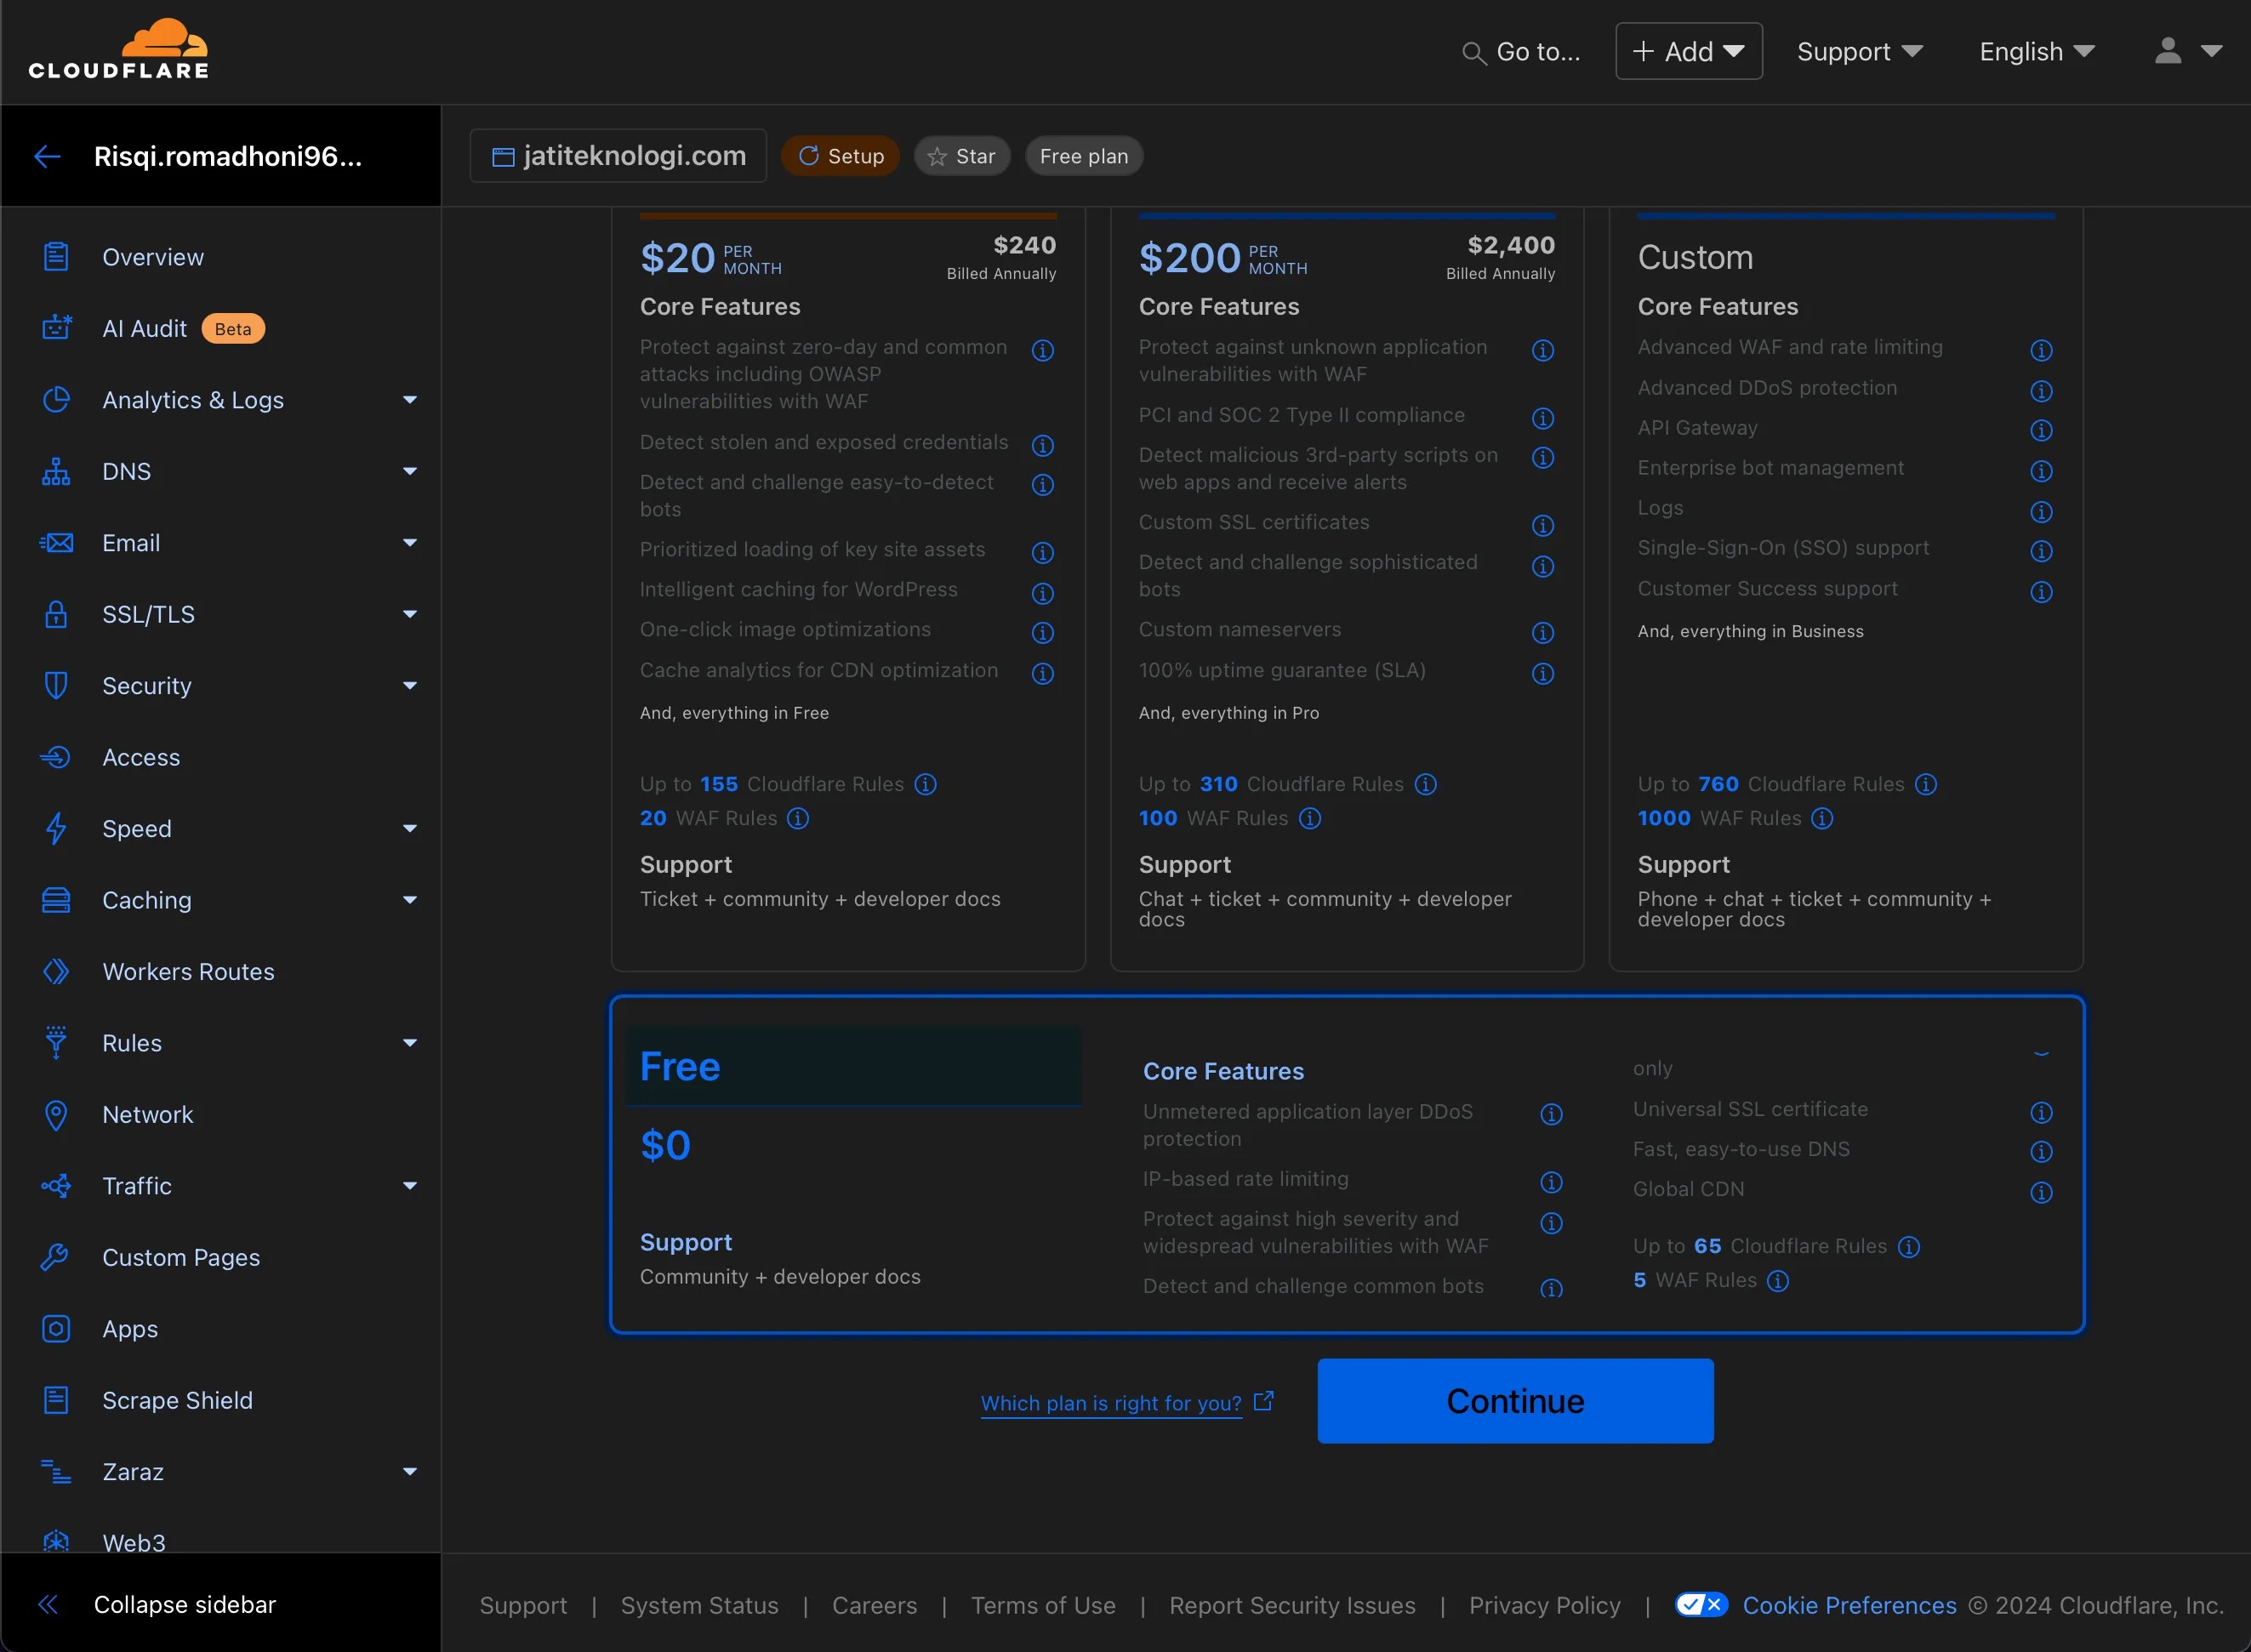 Scroll to the bottom of the price list and select the “Free” price package and press continue.
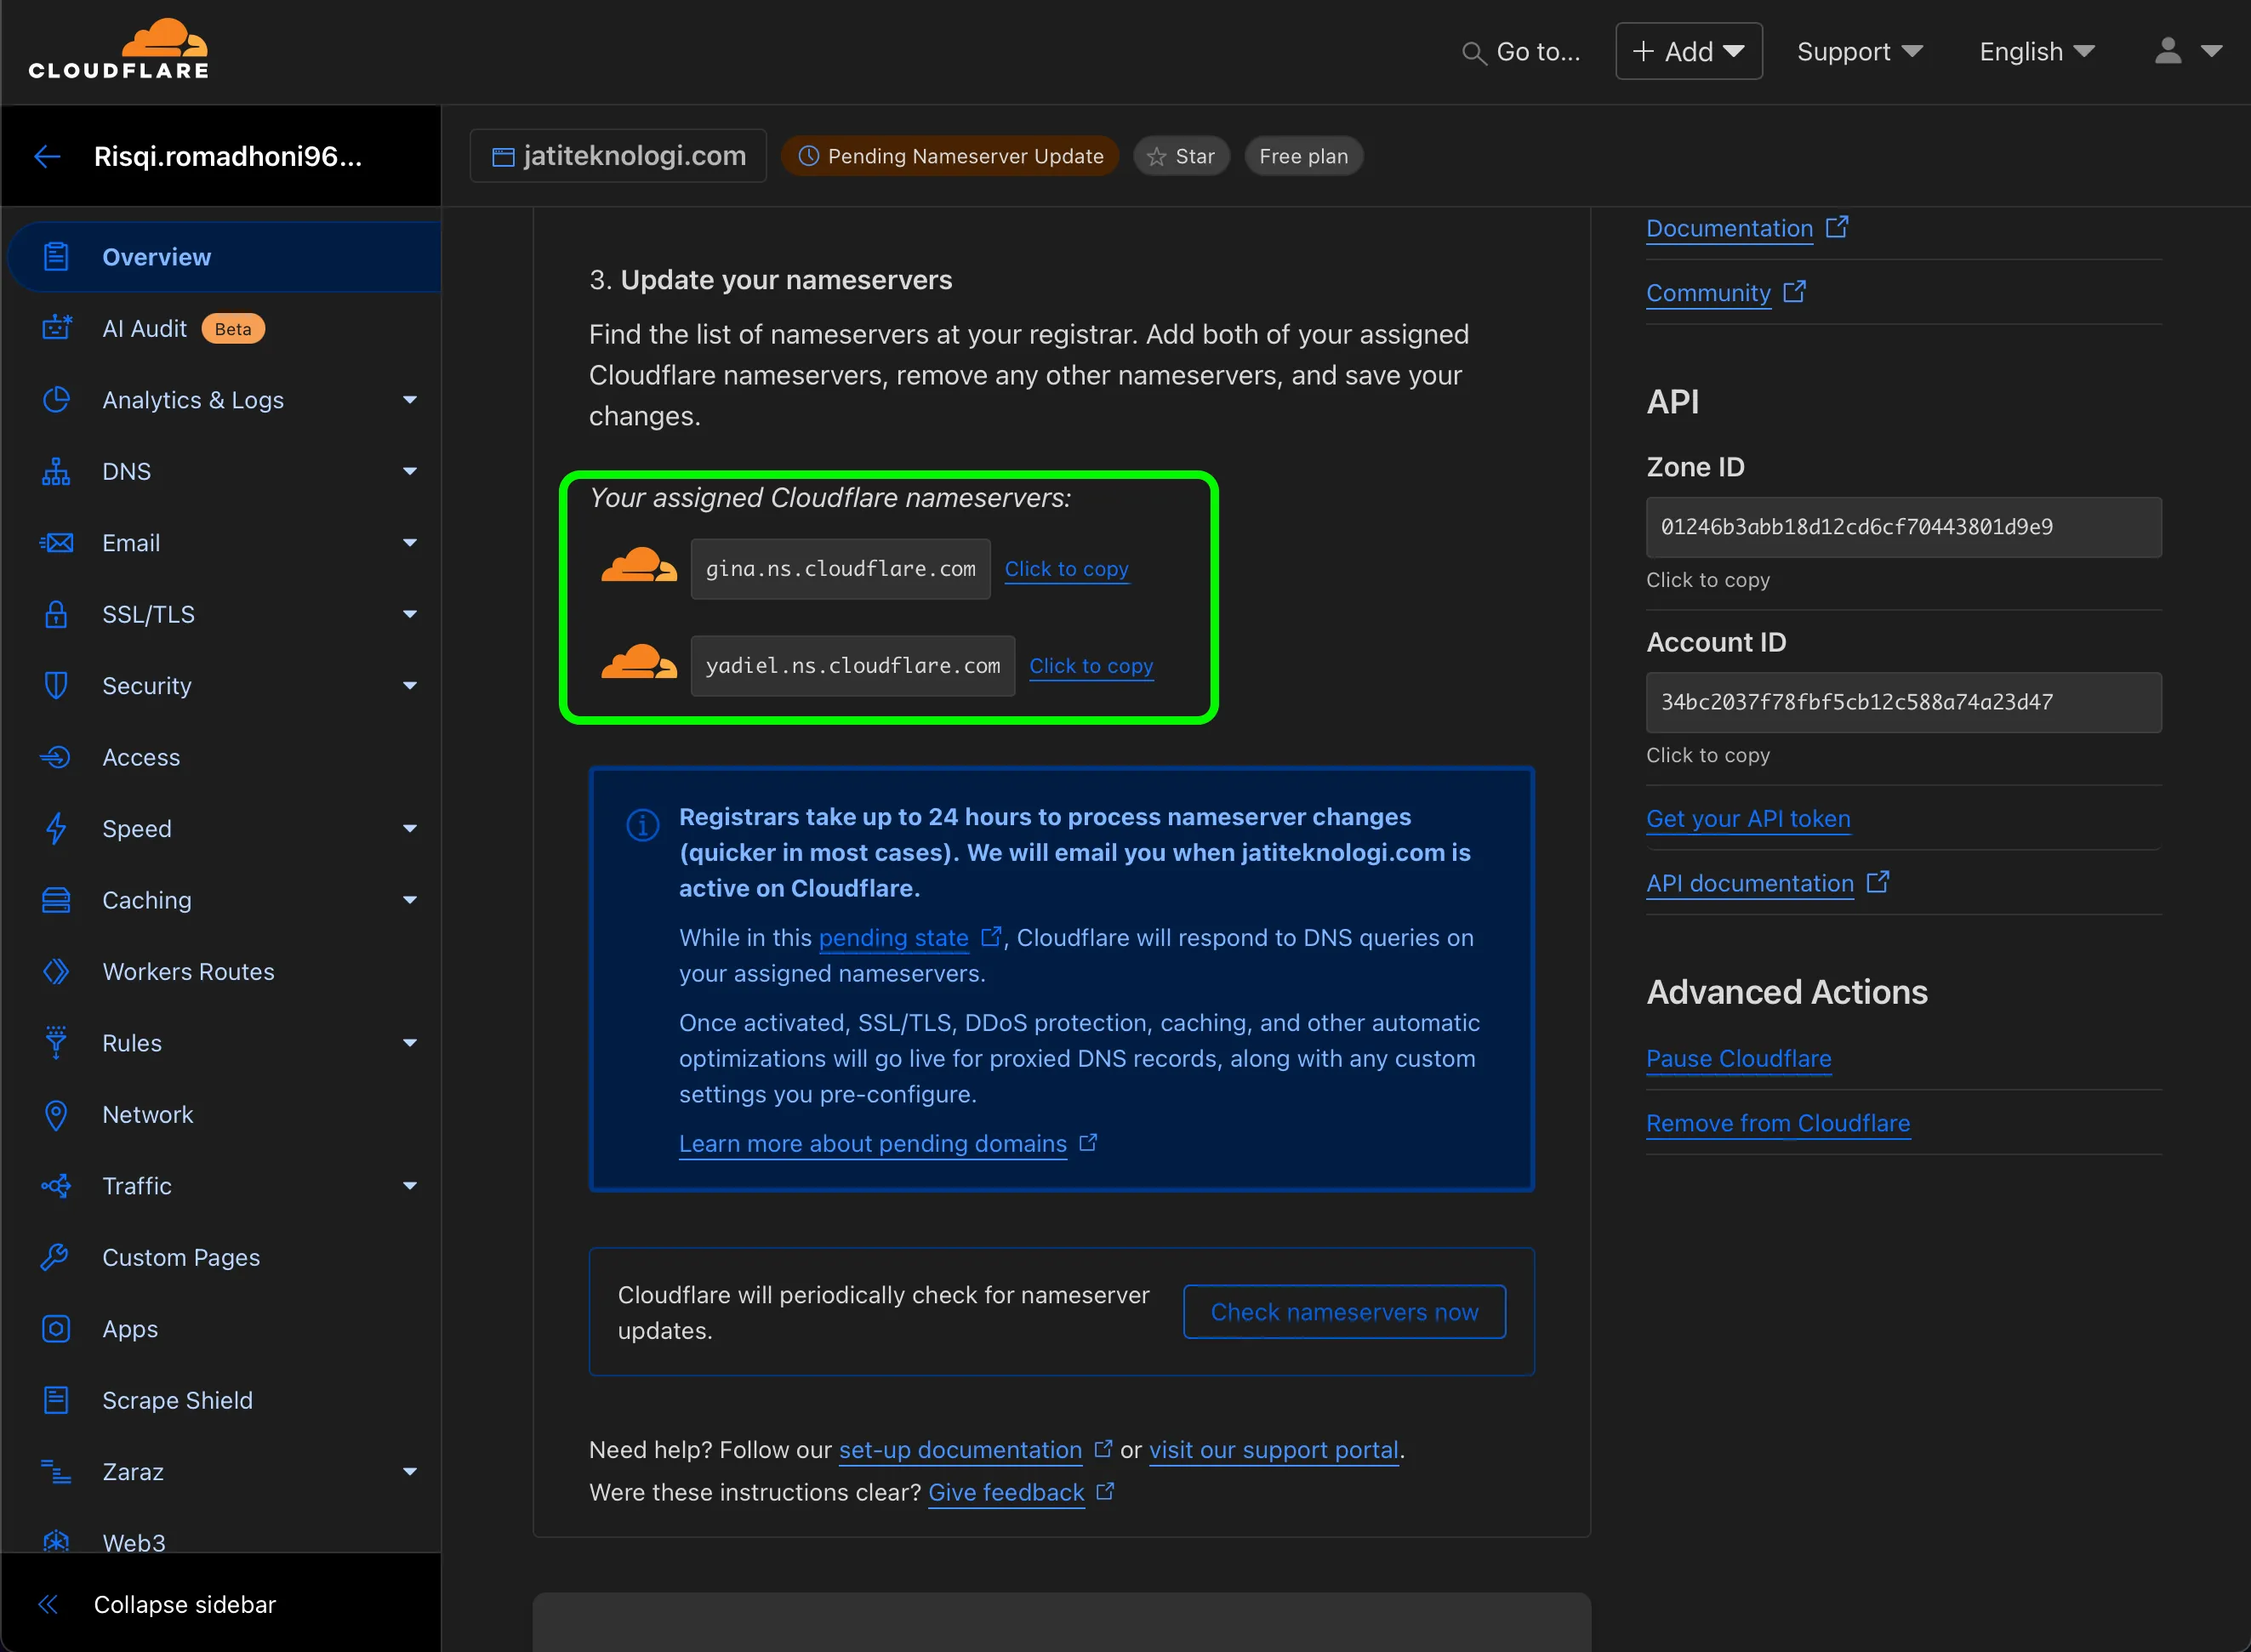 To find the Nameserver (NS), scroll down, and you will find two Nameservers used by Cloudflare. Copy or save these two Nameservers. Then return to the Niagahoster dashboard tab on the “DNS/Nameserver” page.
 - Manage DNS/Nameserver
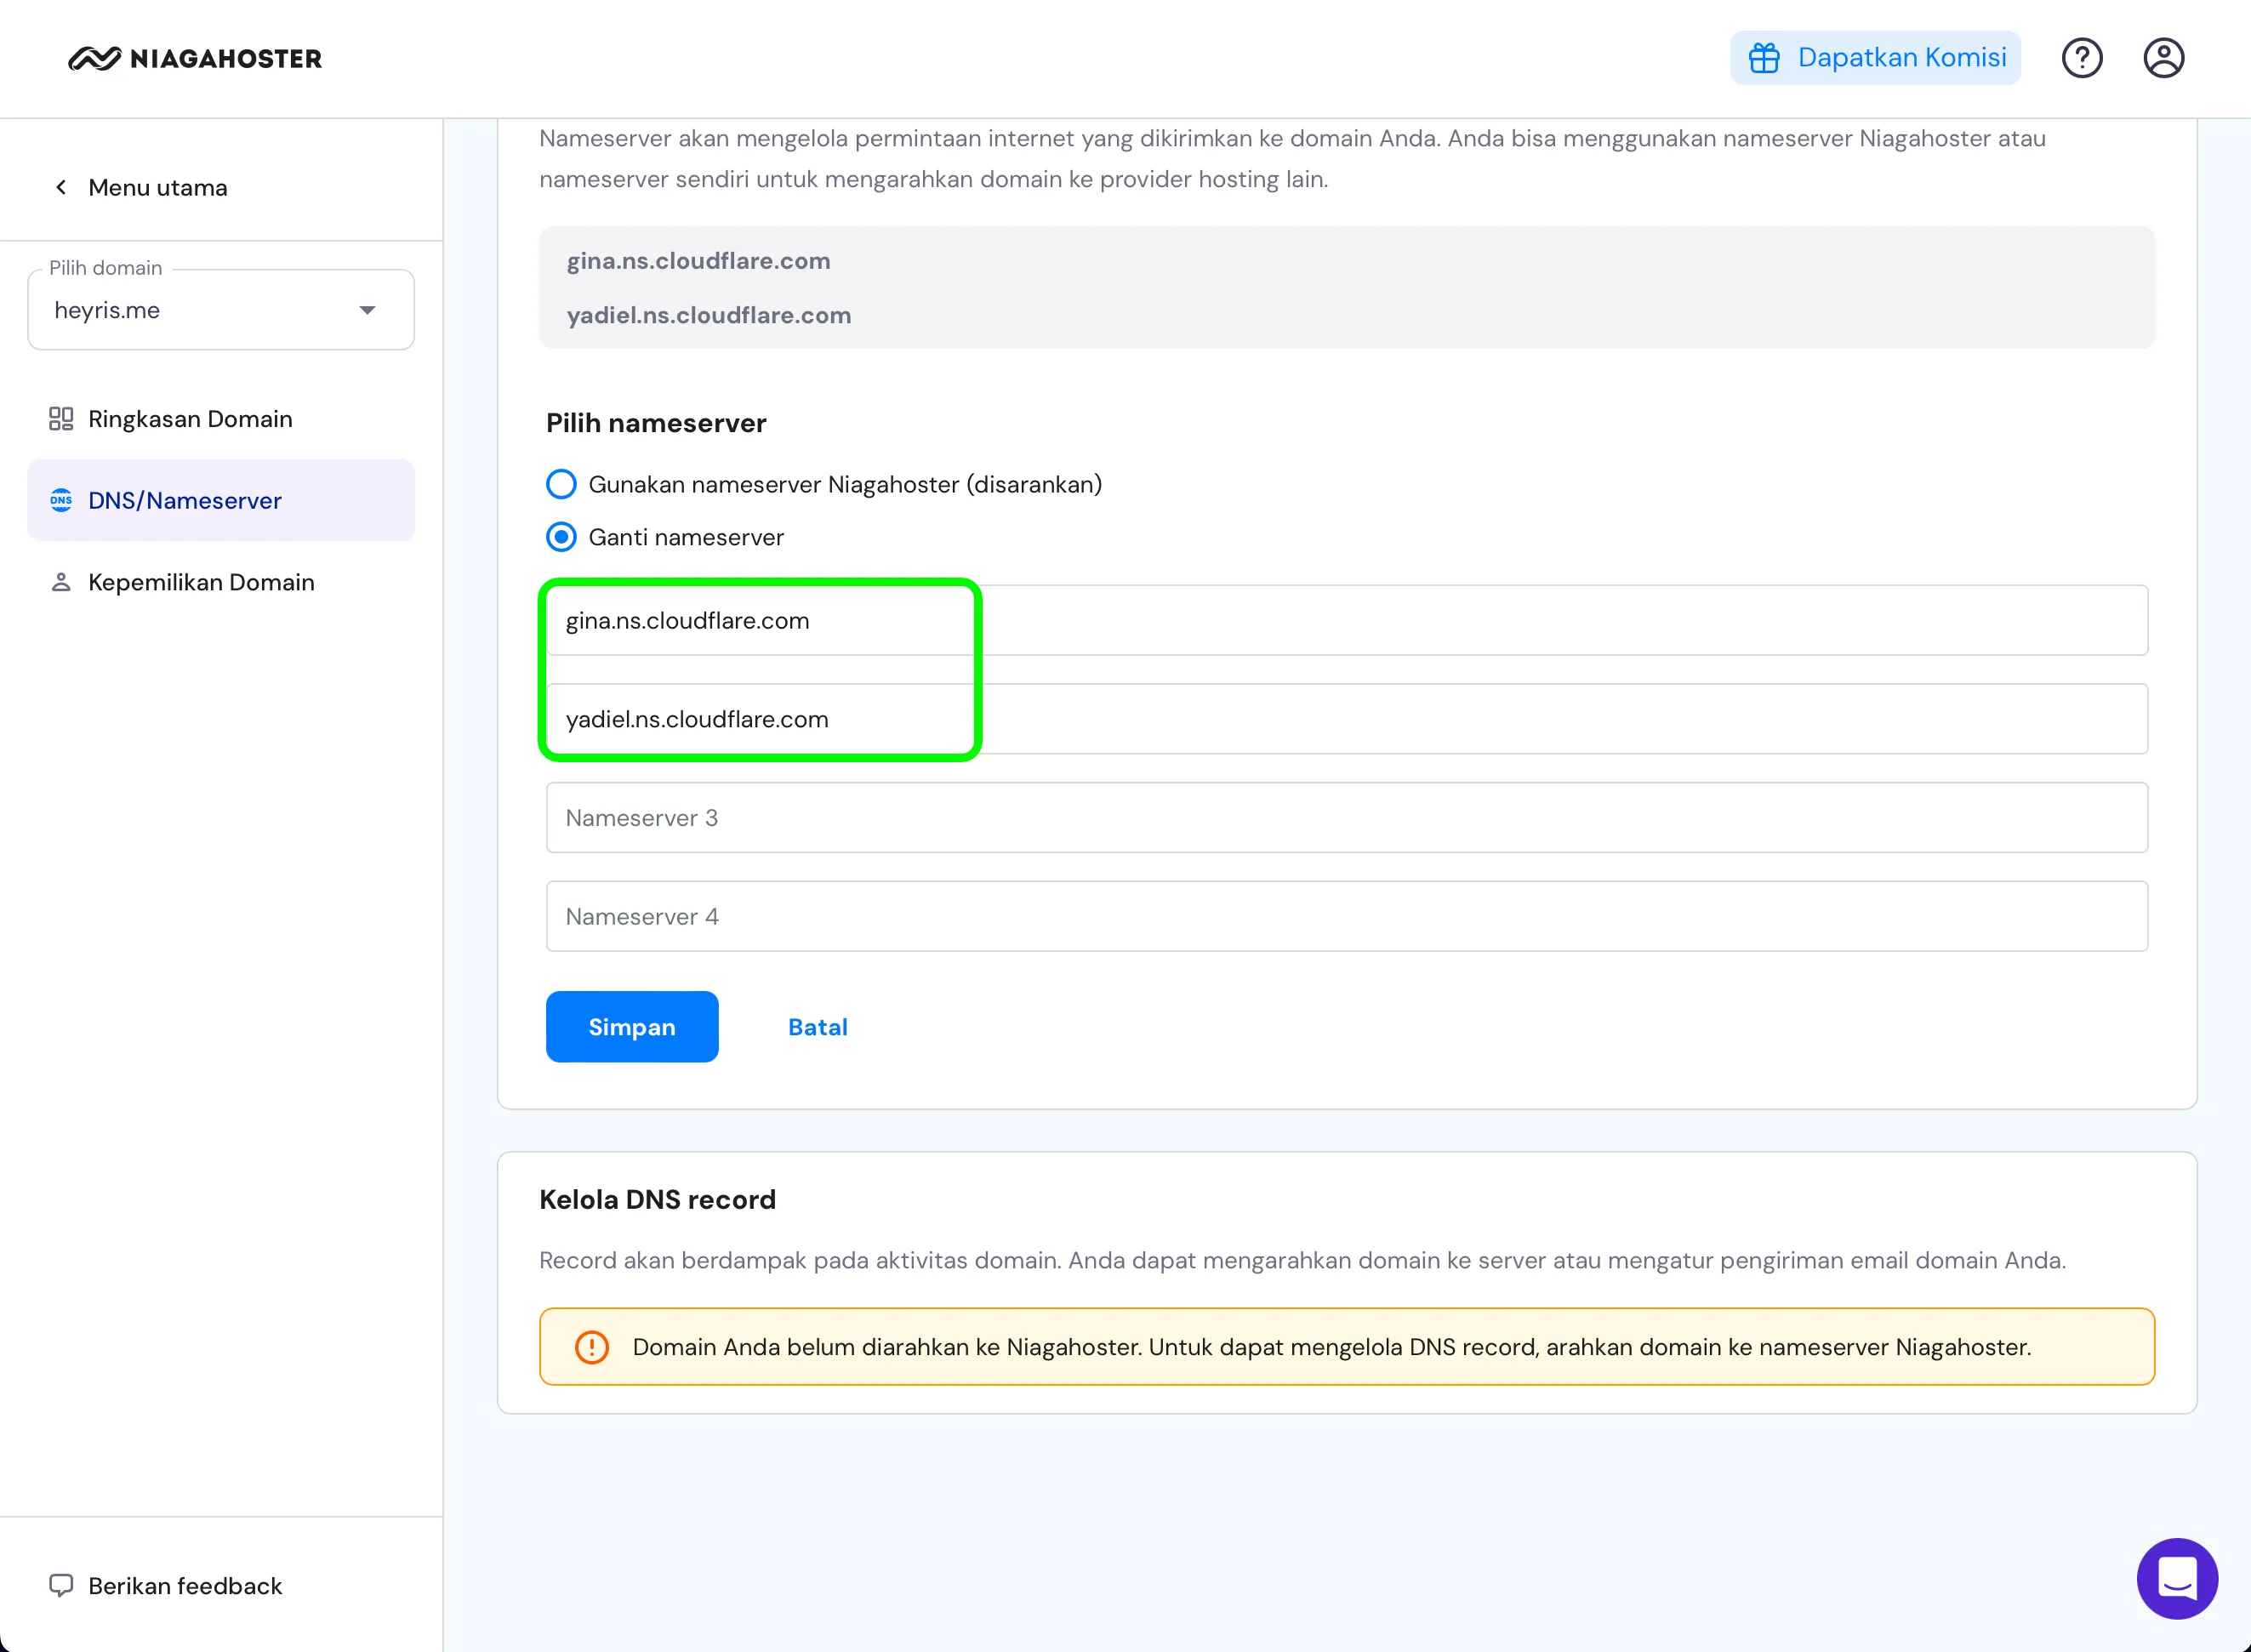 On this page, you will be presented with 2 options: Use Niagahoster and Change nameserver. Choose Change nameserver and fill in the input for the first and second order with the Nameservers we obtained in the previous step.
3. Checking Nameserver Propagation
After completing the above steps, we need to wait at least 24 hours for the Nameserver Domain transfer process to complete. We can continuously check using tools called DNS Checkers, e.g., gdnspc or using the command line as follows in the terminal with the command ping heyris.me (in this example using the domain heyris.me, change it according to your domain).
PING heyris.me (172.67.207.132): 56 data bytes64 bytes from 172.67.207.132: icmp_seq=0 ttl=54 time=21.277 ms64 bytes from 172.67.207.132: icmp_seq=1 ttl=54 time=27.960 ms64 bytes from 172.67.207.132: icmp_seq=2 ttl=54 time=21.485 ms64 bytes from 172.67.207.132: icmp_seq=3 ttl=54 time=21.927 ms64 bytes from 172.67.207.132: icmp_seq=4 ttl=54 time=31.846 ms64 bytes from 172.67.207.132: icmp_seq=5 ttl=54 time=62.449 ms64 bytes from 172.67.207.132: icmp_seq=6 ttl=54 time=30.657 ms64 bytes from 172.67.207.132: icmp_seq=7 ttl=54 time=30.409 ms64 bytes from 172.67.207.132: icmp_seq=8 ttl=54 time=42.455 ms64 bytes from 172.67.207.132: icmp_seq=9 ttl=54 time=38.346 ms64 bytes from 172.67.207.132: icmp_seq=10 ttl=54 time=32.254 ms64 bytes from 172.67.207.132: icmp_seq=11 ttl=54 time=28.314 ms64 bytes from 172.67.207.132: icmp_seq=12 ttl=54 time=25.357 ms64 bytes from 172.67.207.132: icmp_seq=13 ttl=54 time=21.101 ms64 bytes from 172.67.207.132: icmp_seq=14 ttl=54 time=33.773 ms64 bytes from 172.67.207.132: icmp_seq=15 ttl=54 time=29.865 ms64 bytes from 172.67.207.132: icmp_seq=16 ttl=54 time=23.443 ms64 bytes from 172.67.207.132: icmp_seq=17 ttl=54 time=30.314 ms64 bytes from 172.67.207.132: icmp_seq=18 ttl=54 time=30.543 ms64 bytes from 172.67.207.132: icmp_seq=19 ttl=54 time=33.960 ms64 bytes from 172.67.207.132: icmp_seq=20 ttl=54 time=31.289 ms64 bytes from 172.67.207.132: icmp_seq=21 ttl=54 time=25.613 ms64 bytes from 172.67.207.132: icmp_seq=22 ttl=54 time=31.871 ms64 bytes from 172.67.207.132: icmp_seq=23 ttl=54 time=31.075 ms64 bytes from 172.67.207.132: icmp_seq=24 ttl=54 time=26.662 ms64 bytes from 172.67.207.132: icmp_seq=25 ttl=54 time=29.052 ms64 bytes from 172.67.207.132: icmp_seq=26 ttl=54 time=23.516 ms64 bytes from 172.67.207.132: icmp_seq=27 ttl=54 time=29.810 ms64 bytes from 172.67.207.132: icmp_seq=28 ttl=54 time=30.437 ms64 bytes from 172.67.207.132: icmp_seq=29 ttl=54 time=30.324 ms64 bytes from 172.67.207.132: icmp_seq=30 ttl=54 time=30.424 ms--- heyris.me ping statistics ---31 packets transmitted, 31 packets received, 0.0% packet lossround-trip min/avg/max/stddev = 21.101/30.252/62.449/7.535 ms4. Memvalidasi Domain
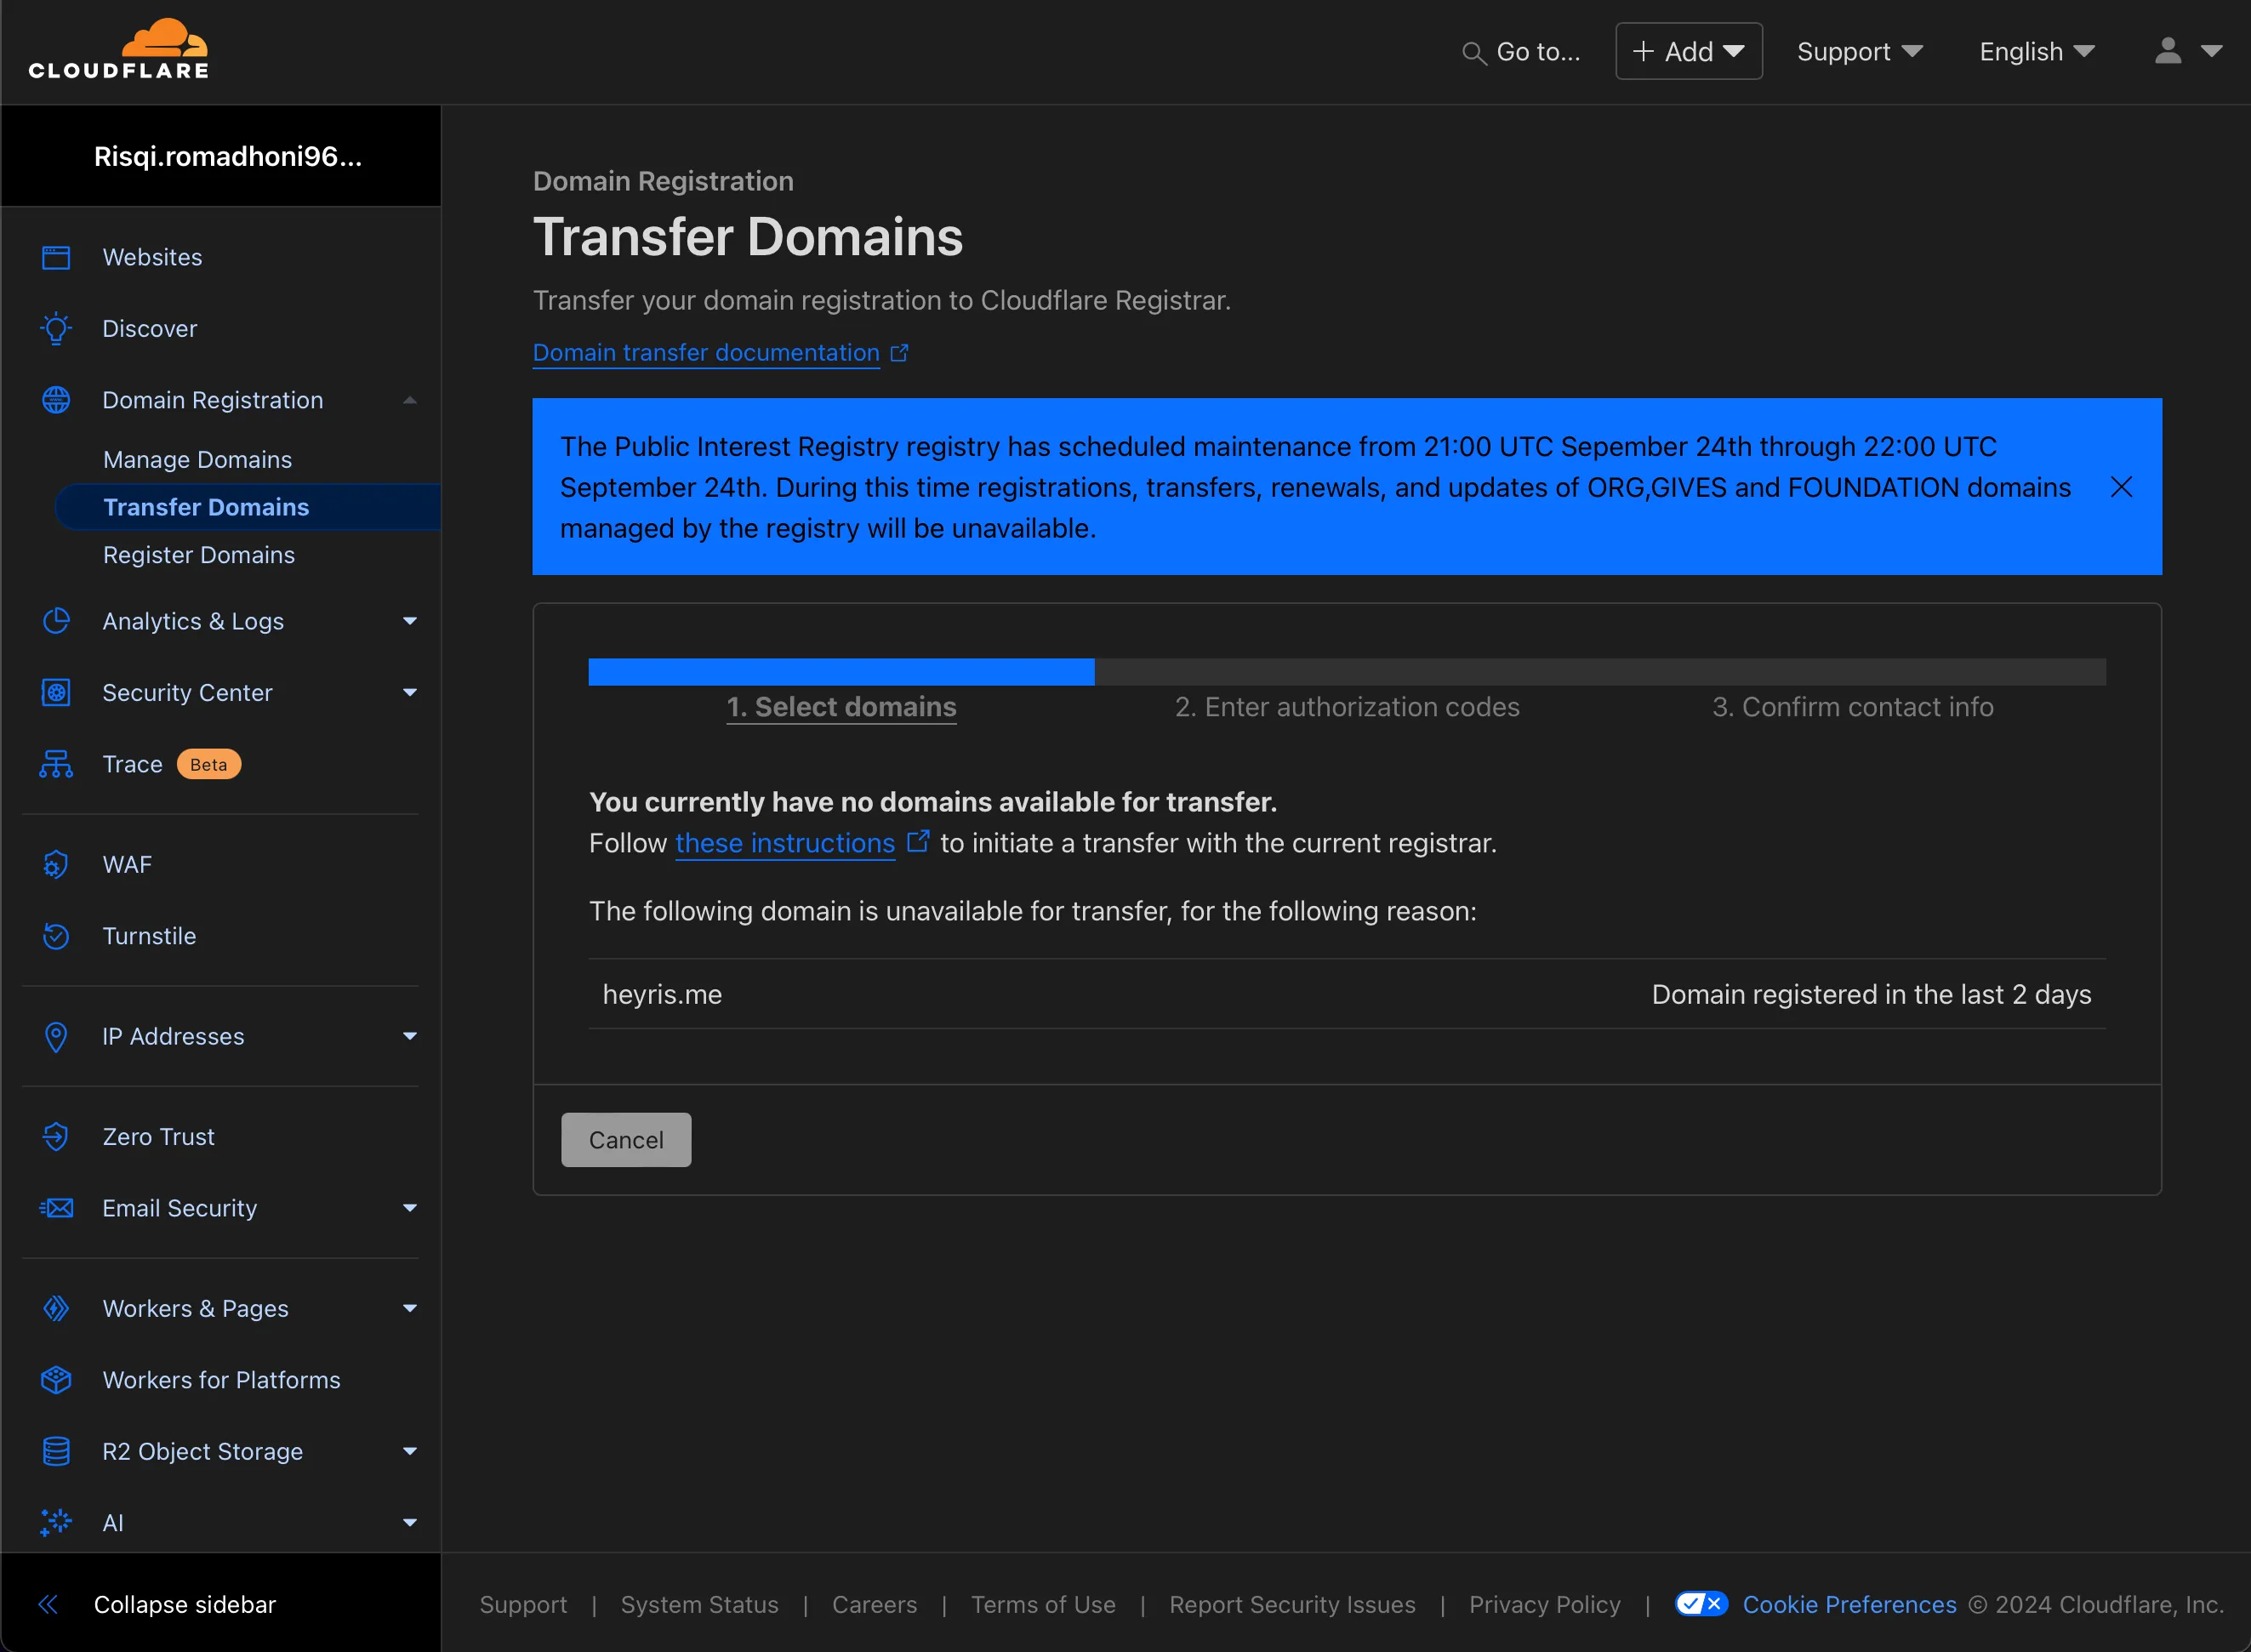 Setelah propagasi selesai maka kita dapat melihat domain telah terdaftar pada halaman “Domain Registration > Transfer Domains”
Kesimpulan
Transfer domain ke Cloudflare memberikan keuntungan seperti perlindungan gratis SSL, optimisasi kecepatan situs, dan fitur keamanan tambahan seperti DDoS protection. Dengan harga yang terjangkau dan bahkan opsi gratis, Cloudflare menjadi pilihan ideal untuk pemilik website yang ingin meningkatkan performa dan keamanannya tanpa mengeluarkan biaya besar. Langkah-langkah transfer domain ini mudah diikuti, dan proses propagasi nameserver biasanya selesai dalam waktu 24 jam.
